Category Archives: 4X4

Grenadier build – carpet grabber pouches

The carpet grabber pouches/pockets have arrived from CrazyDog Canvas. With Velcro hooks on the back, the pouches just stick to the new carpeted bracket.

Easy to reconfigure if needed.

The Doc’s Jetboil is in one pocket, the middle pocket has a lantern and USB cables (or whatever) and the other has spare gas for the Jetboil. The fourth pocket was attached to The Doc’s Bushman fridge cover to give some storage area on the back of the fridge.

Eromanga trip – Nicotiana megalosiphon

Common name wild tobacco. It only grows in shaded areas, which are not that common out Eromanga way. At one sand dune The Doc saw the plant growing around some trees – but only where the bloodwood tree provided shade for much of the day. These images were from a shaded area behind the Eromanga Natural History Museum.

Eromanga trip – Acacia tetragonophylla

Also known as Prickly Wattle. Images from two locations, first Peglers Pond about 7km east of Eromanga; second some dams west of Eromanga, beside the Cooper Developmental Road. Click on image to see full size.

Grenadier build – Outback Shakedown Round 3 (2 to come)

Today the Australian Wildlife Conservancy stickers went on the car. The Doc found himself smiling when driving back home, as the build is now complete after some changes yesterday (those are being written up). The first time he can remember being so happy since the fatal car accident 18 months ago. The Grenadier build has been therapeutic! The Doc is still working through some injuries and trauma but starting to fell better.

The car is back to being AWC’s mobile billboard and ready for The Doc’s Excellent Adventure.

Observant readers will have noticed the car’s name is now official: Wally. Named after the wallaby The Doc hit on the road earlier this year. The Doc added a Wally sticker to the driver’s side bonnet.

Grenadier build – rock sliders

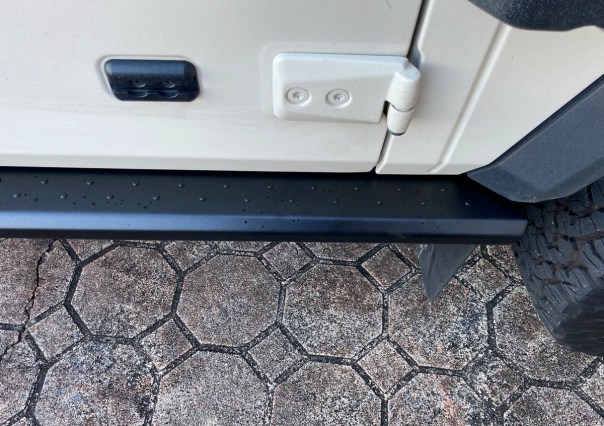
The ABNTR4X4 Rock Sliders were installed today. Very low profile these sliders. From the side they look like the standard under door trim. That mostly finishes the Grenadier build, except a few minor items.

The Doc has removed the rear diesel tanks, so you can see the XSPEC Molle better than before. They will go back on shortly. It takes roughly two minutes to remove/install each tank.

Now preparing for a remote trip to try things out, in Channel Country, Outback Queensland.

Grenadier build – 20 inch lightbar details

WHAT YOU NEED

  1. STEDI Hex brackets (choose size 48 to 53mm). The STEDI hex bracket came with a Torx Security key to tighten the bolts in the hex bracket. Not sure of the size because I could not get my Torx Security bits to fit properly. The brackets come with three M6 bolts of different sizes and types. One pair was the correct length to use in my setup. The Doc also used a Nord Lock washer and a flat washer on the M6 bolt. The Nord Lock washer ensures corrugations do not loosen the bolts.
  2. Lightforce Viper 20-inch lightbar (single or double row of LEDs). The Viper comes with side mount and slide brackets.
  3. Two standard M6 nuts. Only a standard M6 nut fitted into the hex bracket slot, a M6 Nylon Lock Nut was too thick. The hex bracket only came with Nylon Lock Nuts. See also point 1 below under FITTING.
  4. Relay, tools and wiring.
  5. The Viper had a 2 pin Deutsch DT plug attached and a wiring loom. The power came from the Grenadier’s 10 amp wire ends under the bonnet. The auto electrician changed the loom and added a relay and integrated it into the car. The Doc never saw the modified loom. The relay turns on the lights when it senses current to the high beam on your spotlights (which only work when the highbeams are on).

Laws in News South Wales and WA require lightbars to be fitted to the underside of the Roo Bar hoop, not above it. You have much more flexibility if you can mount it above the Roo Boo, but at increased risk to pedestrians.

FITTING

  1. Affix with the Lightforce slide mounts that attach to the rear of the lightbar (not the ends which use brackets – the Ligthtforce comes with both options supplied) You need to reverse the way the bolts normally insert into the hex bracket. You may need to trim the bolt’s length so it does not protrude pass the width of the bracket onto the Roo Bar. Adding two washers on the M6 bolt was enough so the bolt did not protrude, in my case. The Doc used a Nord Locker washer, flat washer and a standard M6 nut.
  2. Affix the slide brackets to the bottom half of both hex brackets. The nut must go inside the hex bracket slot, not the bolt head as normal. The image below of the slide bracket shows the correct orientation for inserting the bolt into the hex bracket.
  3. Attach the slide brackets to the lightbar. Tighten bolts onto the slide brackets, after spacing them correctly (The Doc placed then 100mm in from each end of the lightbar). Just hand tighten the bolts and check the angle of the lightbar fitted under the Roo Bar, adjust position of slide brackets if needed. You do have some additional adjustment with the way you affix the hex bracket to the Roo Bar.
  4. Attach hex brackets to the Roo Bar, check it is centered correctly. Tighten all 8 bolts in the hex brackets. TIP: when tightening the Torx Security bolts on the hex bracket, The Doc would tighten a bolt two turns and then go around and do the same to all the bolts. If you tighten one bolt too much, it can result in another becoming loose. The described approach minimised that effect.
  5. Wire up the lightbar or call ORS (Sydney based) and have then do it for you.

The Single Row Viper Lightbar lines up nicely with the grille cross support to minimise disruption to the air flow.

ANOTHER OPTION: If you do not have a winch, fitting the 20-inch Viper down on the bumper would be another option. Or if you do have a winch, be very careful about drilling holes in the bumper. The end brackets could be used for mounting in this position.

Grenadier build – fuel tanks

XSPEC Molle panels with diesel fuel tanks installed today. One on each side. XHQ also solved the electrical problem, fixed it and found a new wiring issue with the recent 20 inch LED lightbar install (glad The Doc asked them to look the lightbar over). It was a quick fix.

The electrical problem was caused when the dashcam was installed by my installer. It did not affect the dashcam but a fuse for the Power ON switch on the roof panel. Now all fixed. That explains why the all aux power circuits where down, the ON switch was not working, due to the blown fuse.

Everything now working as it should. Final niggles gone.

You can also see the JOOCLA Ensuite mounted on the driver’s side of the car, above the diesel tank.

Grenadier build – Lightforce Viper installed

20-inch Lighftforce Viper LED lightbar installed today. Images below, the pictures were taken after the lightbar was attached, but it was not wired up and the blue protective film was still over the lens. A detailed install guide will be posted.

Grenadier build – Roo Bar lightbar

The Doc has been working on a little project for a few weeks now. He finds out tomorrow whether it will work. EDIT: all done look here.

He was going to install a 10-inch low profile LED Lightbar under the top loop of the Roo Bar (in NSW it is illegal to mount then above the Roo Bar – even though people do it).

After some research his is now trying to mount a 20-inch lightbar there instead– it will either just fit or not fit. It is so close we need to do an actual test fit.

He needed low profile mounting brackets, which he now has and has done a test bracket fitting. The Doc had worked out 3 ways to mount the 20-inch lightbar to the bracket, but after the test fitting 2 of those ways will not work. All 3 should work with a 10-inch lightbar. Power will come from the 10 amp bonnet circuit, with some other wiring.

The Doc did not want my mounting brackets or lightbar to be an additional pedestrian risk, so everything must be behind or inline with the Roo Bar. When mounted, the Roo Bar slopes backwards from the bumper.

When he visits ORS tomorrow, we will try and fit the 20-inch lightbar, the worst-case scenario is we fit the 10-inch lightbar instead.

The Doc could not find many 15-inch lightbars with the right profile – he found one with a hefty price tag (over twice the price of the one he is buying). The Doc wants to reduce any interference with air flow to the radiator, so options are limited to single row, low profile lightbars.

The Doc could probably mount the 20 inch lightbar down of the bumper, but with a winch installed, he does not want to drill holes or have bolts in the bumper anywhere near the winch.