Common name wild tobacco. It only grows in shaded areas, which are not that common out Eromanga way. At one sand dune The Doc saw the plant growing around some trees – but only where the bloodwood tree provided shade for much of the day. These images were from a shaded area behind the Eromanga Natural History Museum.
Also known as Prickly Wattle. Images from two locations, first Peglers Pond about 7km east of Eromanga; second some dams west of Eromanga, beside the Cooper Developmental Road. Click on image to see full size.
Today the Australian Wildlife Conservancy stickers went on the car. The Doc found himself smiling when driving back home, as the build is now complete after some changes yesterday (those are being written up). The first time he can remember being so happy since the fatal car accident 18 months ago. The Grenadier build has been therapeutic! The Doc is still working through some injuries and trauma but starting to fell better.
The car is back to being AWC’s mobile billboard and ready for The Doc’s Excellent Adventure.
Observant readers will have noticed the car’s name is now official: Wally. Named after the wallaby The Doc hit on the road earlier this year. The Doc added a Wally sticker to the driver’s side bonnet.
Some flora images from the Eromanga trip. Solanum ellipticum or more commonly known as the Potato Bush, Dhiilguwin, Nightshade, Velvet Potato Bush, Wild Tomato, Tomato Bush, Wild Gooseberry, Potato Weed, Velvet Potato-Bush, Hillside Flannel Bush, Velvet Nightshade!
The Doc has started taking the Grenadier off road in the Queensland Outback around Eromanga – home of Australia’s giant dinosaurs.
One thing he noticed is how quick tyre temps and pressures increased when he hit the corrugations (washboard). Temperature jumps that take an hour to an hour and a half on the road took about 10 minutes on the corrugations.
The car performs well on corrugations, but The Doc has not hit really bad corrugations yet. The Doc visited Pegler’s Pond this morning, which is running low on water. Out here all the water is brown from the suspended silt. Not long after, it started to rain turning the dust into mud.
As The Doc writes, Galahs and Correllas are flying around screeching, enjoying the rain.
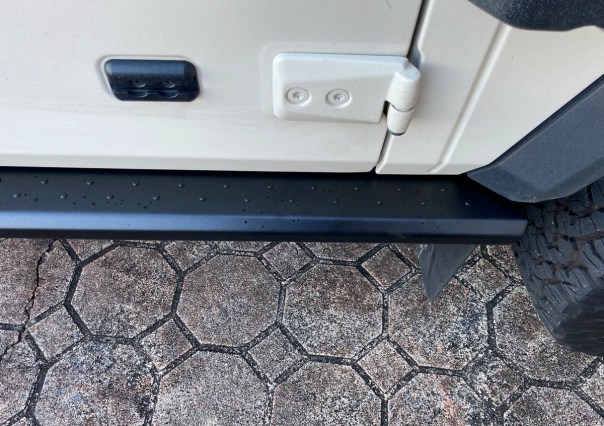
The ABNTR4X4 Rock Sliders were installed today. Very low profile these sliders. From the side they look like the standard under door trim. That mostly finishes the Grenadier build, except a few minor items.
The Doc has removed the rear diesel tanks, so you can see the XSPEC Molle better than before. They will go back on shortly. It takes roughly two minutes to remove/install each tank.
Now preparing for a remote trip to try things out, in Channel Country, Outback Queensland.
STEDI Hex brackets (choose size 48 to 53mm). The STEDI hex bracket came with a Torx Security key to tighten the bolts in the hex bracket. Not sure of the size because I could not get my Torx Security bits to fit properly. The brackets come with three M6 bolts of different sizes and types. One pair was the correct length to use in my setup. The Doc also used a Nord Lock washer and a flat washer on the M6 bolt. The Nord Lock washer ensures corrugations do not loosen the bolts.
Two standard M6 nuts. Only a standard M6 nut fitted into the hex bracket slot, a M6 Nylon Lock Nut was too thick. The hex bracket only came with Nylon Lock Nuts. See also point 1 below under FITTING.
Relay, tools and wiring.
The Viper had a 2 pin Deutsch DT plug attached and a wiring loom. The power came from the Grenadier’s 10 amp wire ends under the bonnet. The auto electrician changed the loom and added a relay and integrated it into the car. The Doc never saw the modified loom. The relay turns on the lights when it senses current to the high beam on your spotlights (which only work when the highbeams are on).
Laws in News South Wales and WA require lightbars to be fitted to the underside of the Roo Bar hoop, not above it. You have much more flexibility if you can mount it above the Roo Boo, but at increased risk to pedestrians.
FITTING
Affix with the Lightforce slide mounts that attach to the rear of the lightbar (not the ends which use brackets – the Ligthtforce comes with both options supplied) You need to reverse the way the bolts normally insert into the hex bracket. You may need to trim the bolt’s length so it does not protrude pass the width of the bracket onto the Roo Bar. Adding two washers on the M6 bolt was enough so the bolt did not protrude, in my case. The Doc used a Nord Locker washer, flat washer and a standard M6 nut.
Affix the slide brackets to the bottom half of both hex brackets. The nut must go inside the hex bracket slot, not the bolt head as normal. The image below of the slide bracket shows the correct orientation for inserting the bolt into the hex bracket.
Attach the slide brackets to the lightbar. Tighten bolts onto the slide brackets, after spacing them correctly (The Doc placed then 100mm in from each end of the lightbar). Just hand tighten the bolts and check the angle of the lightbar fitted under the Roo Bar, adjust position of slide brackets if needed. You do have some additional adjustment with the way you affix the hex bracket to the Roo Bar.
Attach hex brackets to the Roo Bar, check it is centered correctly. Tighten all 8 bolts in the hex brackets. TIP: when tightening the Torx Security bolts on the hex bracket, The Doc would tighten a bolt two turns and then go around and do the same to all the bolts. If you tighten one bolt too much, it can result in another becoming loose. The described approach minimised that effect.
Wire up the lightbar or call ORS (Sydney based) and have then do it for you.
The Single Row Viper Lightbar lines up nicely with the grille cross support to minimise disruption to the air flow.
ANOTHER OPTION: If you do not have a winch, fitting the 20-inch Viper down on the bumper would be another option. Or if you do have a winch, be very careful about drilling holes in the bumper. The end brackets could be used for mounting in this position.


You must be logged in to post a comment.